This vignette will go over best practices and standard workflows for
using R and RStudio for Blackstone Research
and Evaluation (BRE).
This will include:
A brief introduction to
RandRStudioA discussion of shared workflow and file management at
BRE.Setting up basic global options in
RStudio.Creating and using
RStudioProjects.Using the
herepackage to build relative file paths using.Rprojfiles.
Introduction and Installation of R and
RStudio
RStudio
is an integrated development environment (IDE) that is designed to run
R, an open-source
programming language for statistical computing and graphics. Both
R and RStudio should be kept up to date, the
most current release for each can be found at the respective links here:
“Install R” and “Install
RStudio”.
Shared Workflow
At Blackstone Research and Evaluation, we will strive to utilize best practices with data science and that starts with implementing a shared workflow in order to make all of our work reproducible across all of our projects.
A shared workflow will ensure that anyone at
BRE will be able to open any work product
(Rmarkdown files ‘.Rmd’ or R scripts ‘.R’) and run it on
their own local machine to reproduce the exact same results as the
original author. This ‘code as truth’ approach reduces confusion and
saves time since R is doing the work once the code is
produced and it will be unnecessary to spend a lot of time pointing and
clicking to save files or create figures in other applications.
In order to achieve this, we must use the same standard workflow,
file management, and setup in RStudio.
File Management
All work products (Rmarkdown files ‘.Rmd’ or R scripts
‘.R’) created in the course of completing a data analysis task,
including any data cleaning and transformation, should be saved to the
correct Blackstone Google Drive project folder.1
Our project folders in the Blackstone Google Drive have a standard folder structure, which looks something like this:2
#> /home/runner/work/_temp/Library/blackstone/2429_DEMO
#> ├── Archive
#> ├── Phase1_Sales_Finance
#> ├── Phase2_Evaluation
#> │   ├── Client_Meeting_Notes
#> │   ├── Concept_Data_Analysis_Guide
#> │   ├── Data
#> │   │   ├── Year1_(2020-2021)
#> │   │   ├── Year2_(2021-2022)
#> │   │   ├── Year3_(2022-2023)
#> │   │   └── Year4_(2023-2024)
#> │   ├── Data_Analysis
#> │   │   ├── Year1_(2020-2021)
#> │   │   ├── Year2_(2021-2022)
#> │   │   ├── Year3_(2022-2023)
#> │   │   └── Year4_(2023-2024)
#> │   ├── Instruments
#> │   └── Logic_Model
#> └── Phase3_Reporting
All raw survey data files should be kept in the correct project year
folder in the Phase 2 - Evaluation/Data folder. So if you
have survey data from ‘Year 4 (2023-2024)’ of a project it should be
save in Phase 2 - Evaluation/Data/Year 4 (2023-2024). Using
subfolders at the project year level will help to organize data from pre
and post surveys, or multiple surveys with different topics for a given
year.
All data analysis files should be kept in the correct project year
folder in the Phase 2 - Evaluation/Data Analysis
folder.
Later, we will go over how to use RStudio
Projects to create a subfolder in the correct project year
folder in Phase 2 - Evaluation/Data Analysis folder to
organize these files and how to run all analyses in the Google Drive
folder by importing data from the Phase 2 - Evaluation/Data
subfolders. First, lets turn to some basic setup for
RStudio.
RStudio Setup
Our workflow for data analysis at BRE
should center around producing R code that is reproducible
for anyone. We need to all maintain RStudio settings which
help to facilitate that process.
The first step is to make sure that each new R session
is a blank slate and nothing that we have done previously carries over
to our current work.
There are two ways to do this:
Either run
usethis::use_blank_slate()3 orIn
RStudio, go to the top menu bar and select ‘Tools’, then ‘Global Options’, ‘General’ settings and make sure the ‘Workspace’ section (in the blue box) matches the options in figure 1 below:
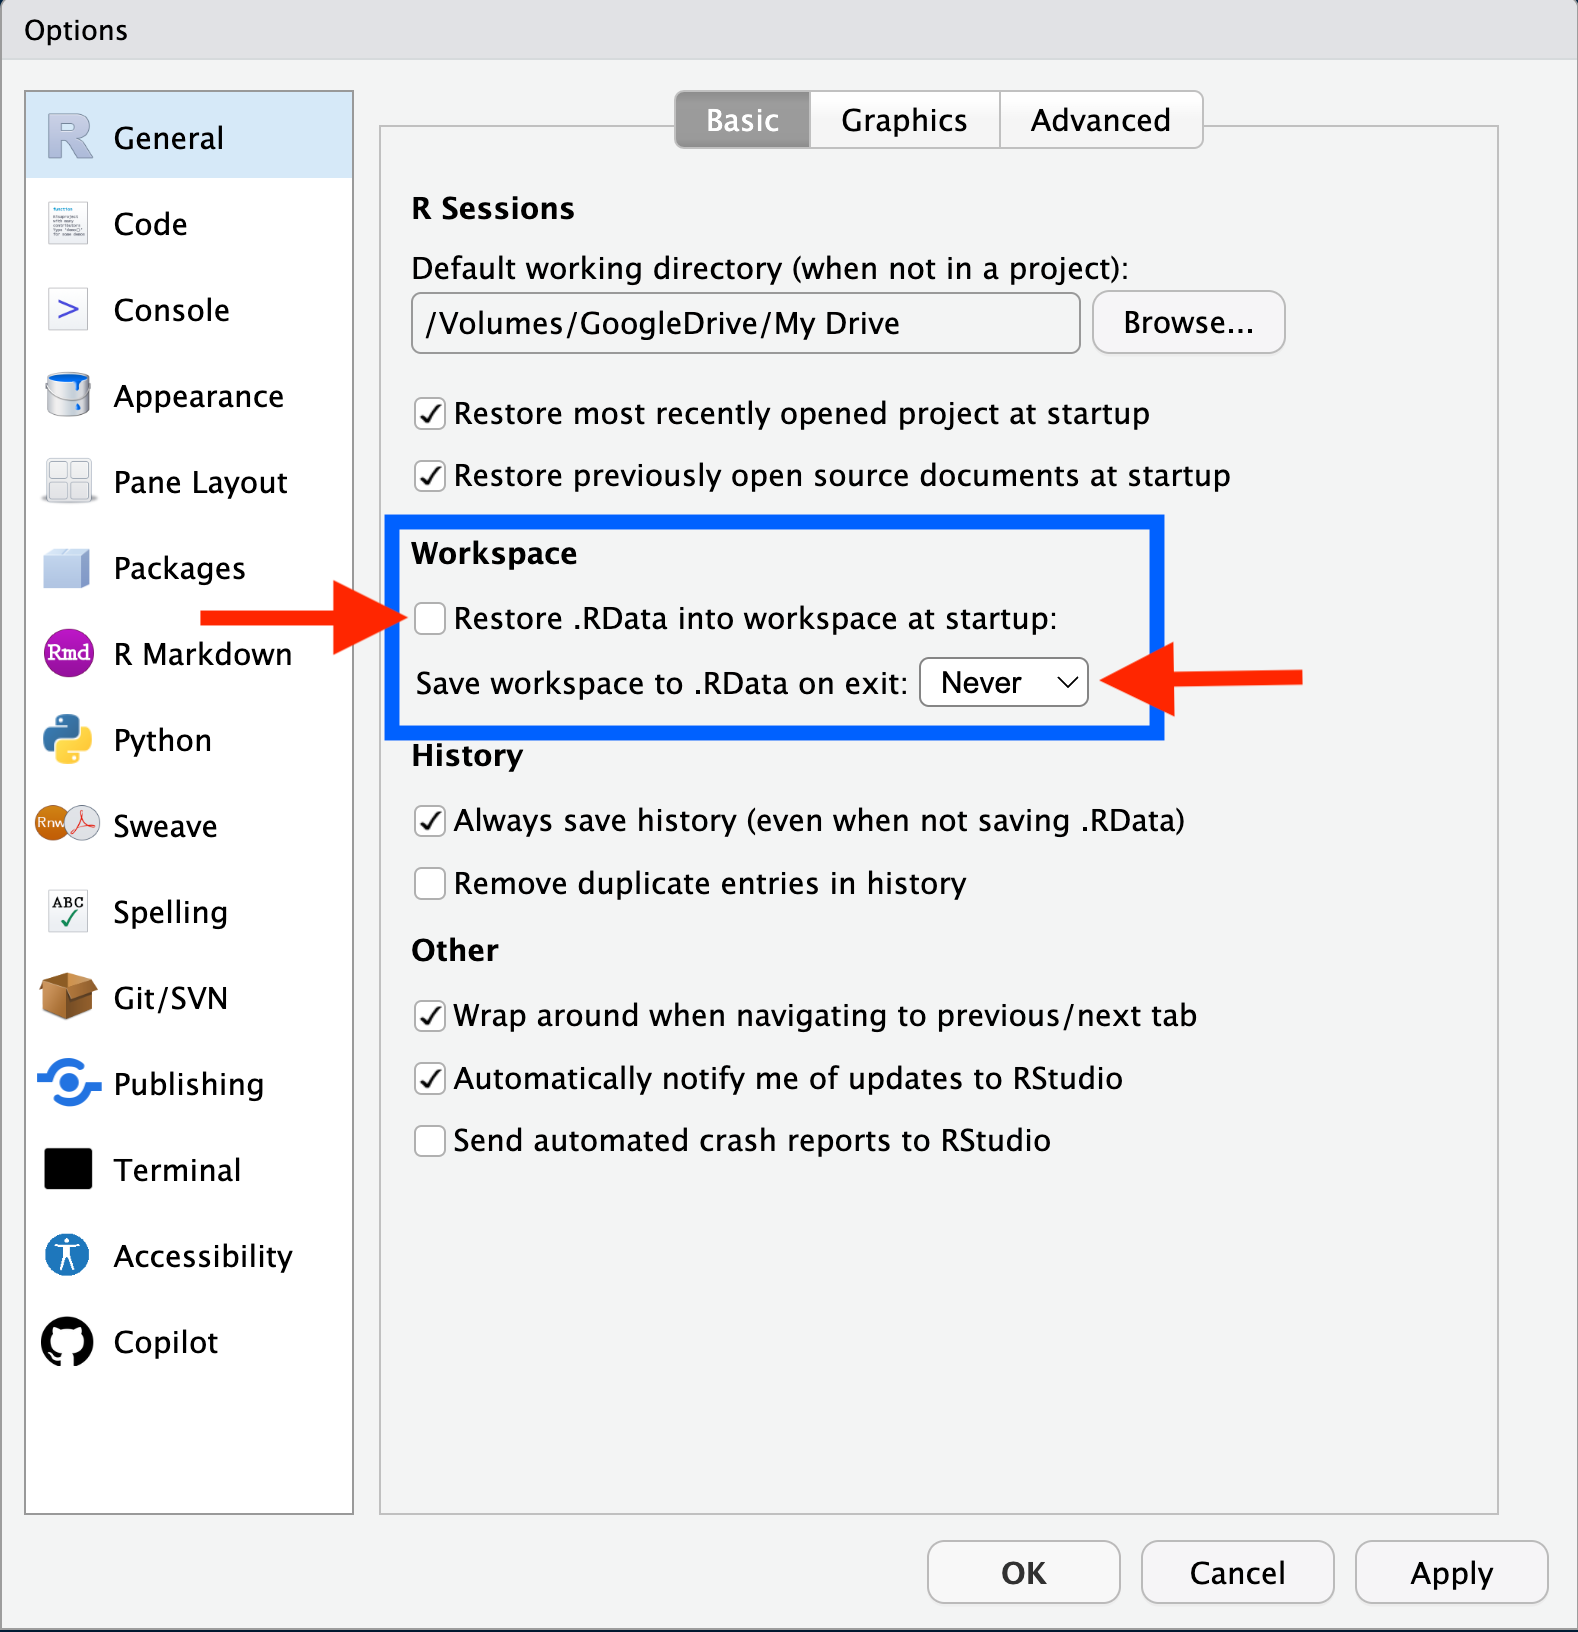
Figure 1: RStudio Global Options
This will ensure that each new R session starts with any
empty global environment (no data or variables from a previous
session).
Also, it is important to routinely restart your R
session and re-run your code to make sure that everything in code
produces the expected results, figures, and outputs. This can be done by
in RStudio by first saving your current work in the
Rmarkdown file(s) (.Rmd) or R script(s) (.R) file, and then
by selecting ‘Session’ in to the top menu bar, clicking
on ‘Restart R’.4 This will clear your global environment and
unload all R packages.
Re-run your code to ensure it includes everything necessary to complete the assigned data tasks.
Creating and using RStudio Projects
Introduction to RStudio Projects
In order to have a shared workflow, we have to have a standard way to
set up and organize all of files necessary for project work at
BRE. We also need a way to set the working
directory5 for each R session that is
reproducible across different users. Using setwd() in code
will work for the original author, but subsequent users will have to
change this file path.
RStudio supports this with RStudio
Projects. An RStudio
Project allows the user to launch RStudio with
its associated folder designated as the current working directory.
Designating a new or existing folder as an RStudio
Project creates a new file in that folder with the extension
.Rproj, this file saves the settings for the Project, among
other things. In the next section, we will go over how to use this file
to set up relative file paths using the designated Project folder as the
root directory.
Double-clicking on the .Rproj, will launch a fresh
RStudio instance with a new R process that has
the working directory set to the parent folder. This allows the user to
easily switch between projects and not have to worry about setting the
working directory or starting a new R process/clean global
environment. Multiple instances of RStudio can also be
opened to different Projects at the same time.
The file browser in each the RStudio instance will show
the current working directory, see figure 2:

Figure 2: RStudio File Browser
It is also shown just above the R
Console as shown in figure 3:

Figure 3: RStudio Console Working Directory
Creating an RStudio Project
To create a new RStudio Project, go to
the top menu bar and select ‘File’, then click on
‘New Project…’, which will launch the ‘New
Project Wizard’.
On the first page ‘Create Project’, Select ‘New Directory’:

Figure 4.1: New Project Wizard- Create Project
On the second page ‘Project Type’, Select ‘New Project’:
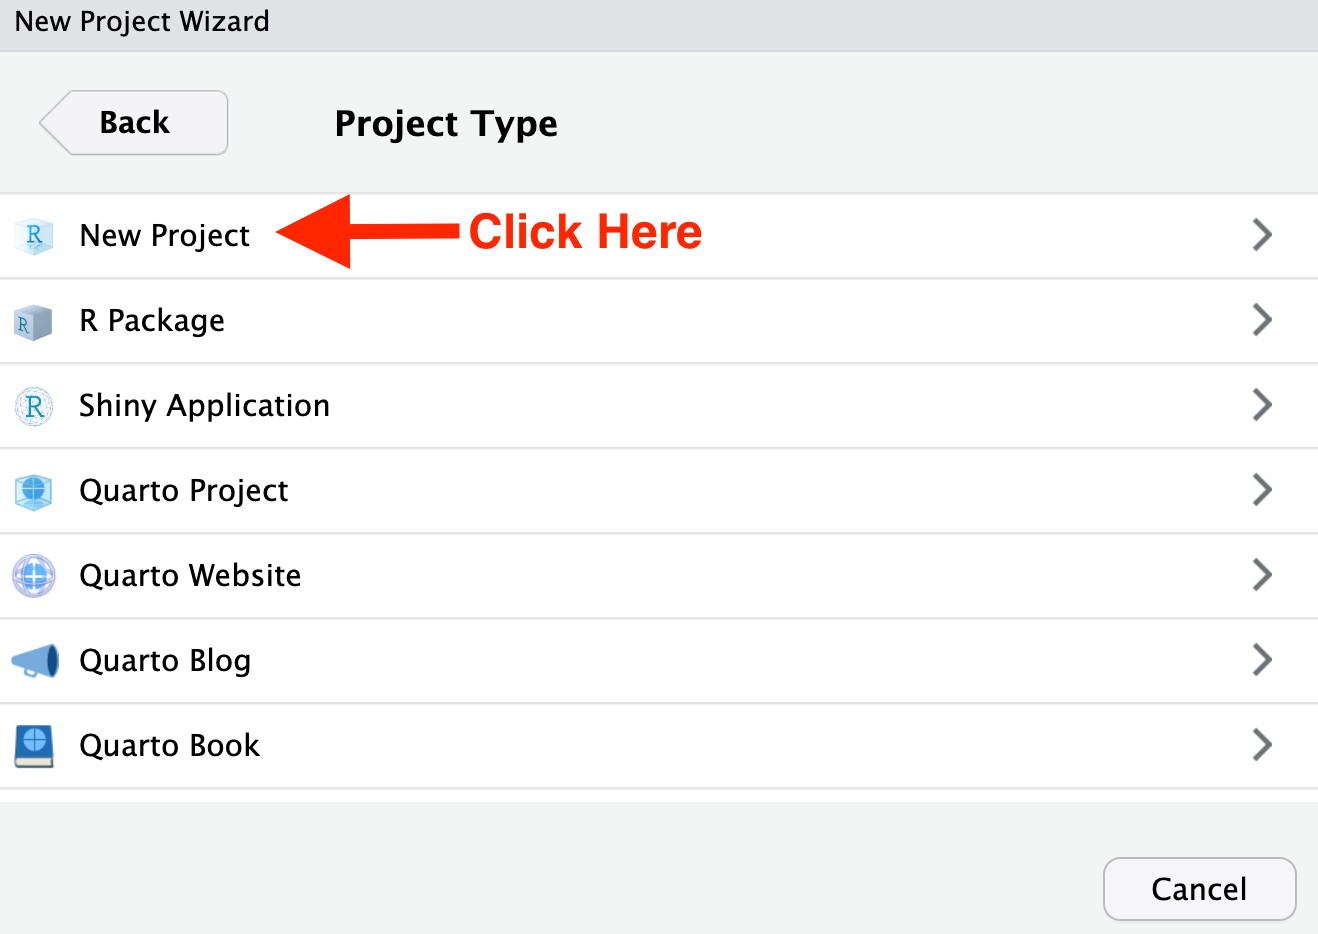
Figure 4.2: New Project Wizard- Project Type
On the third page ‘Create New Project’, check the box for ‘Open in new session’ in lower-left corner, set the ‘Directory name’ to ‘analysis_{Your Initials}’, In ‘Create project as subdirectory of’. click ‘Browse…’, then navigate to the correct project folder: shown below in the next figure 4.4.
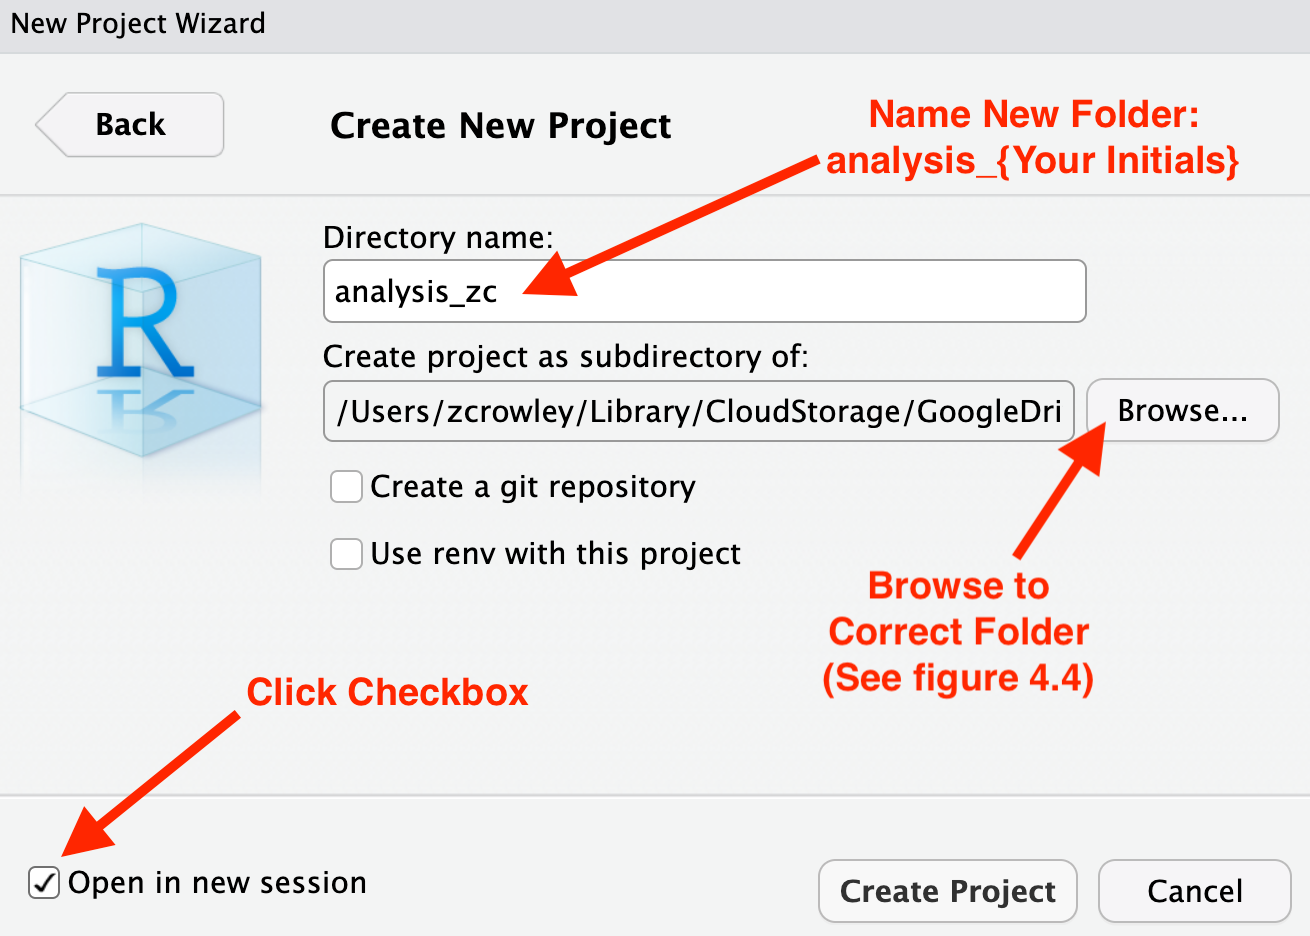
Figure 4.3: New Project Wizard- Name and Set Parent Folder
If hypothetically, you were tasked with a data analysis for Year 4
(2023-2024) of a project, you would go set the parent folder (where the
new project folder will be created) to
Phase 2 - Evaluation/Data Analysis/Year 4 (2023-2024).
After you click on ‘Browse…’ next to ‘Create project as subdirectory of’: navigate to the project folder in the Google Drive then go to the evaluation folder- ‘Phase 2 - Evaluation’, then the ‘Data Analysis’ then ‘Year 4 (2023-2024)’ and click ‘Open’
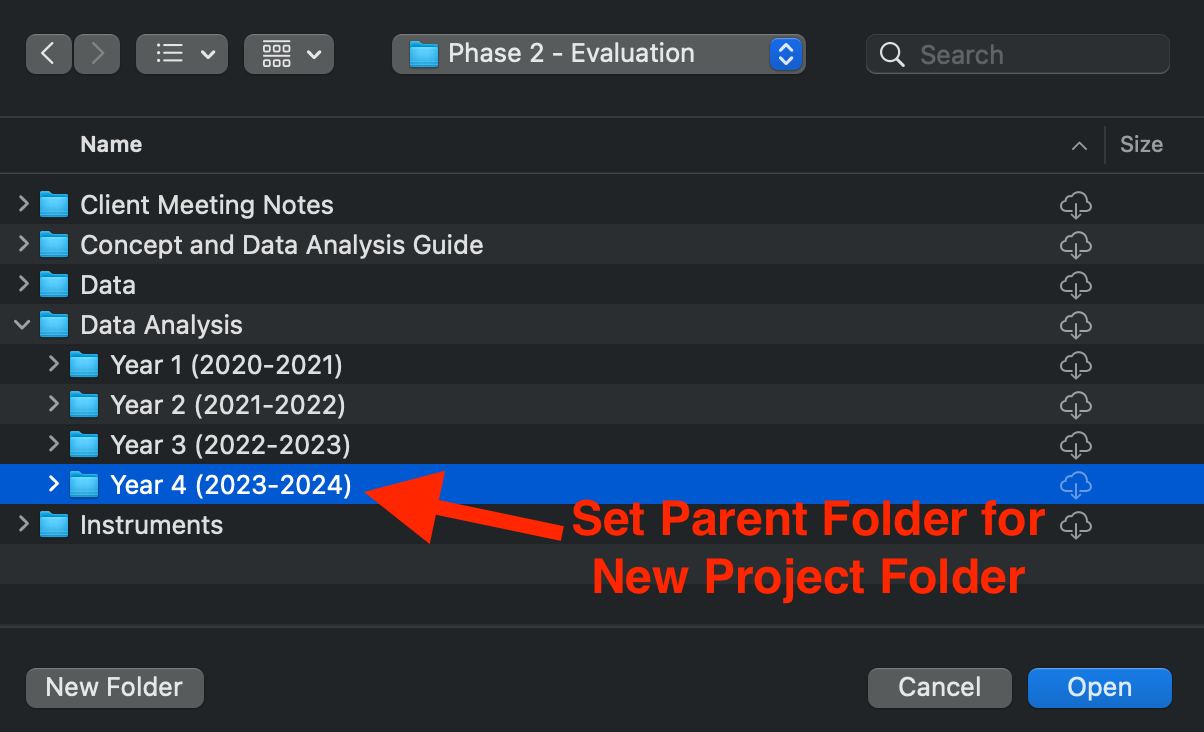
Figure 4.4: Browse to Correct Project Folder
Finally, after setting the correct parent folder, you will be back on the third page ‘Create New Project’.
If you have completed the above steps, the settings should resemble figure 4.5 below and you can proceed to click ‘Create Project’ in the lower-right corner. This will launch the new Project named ‘analysis_{Your Initials}’
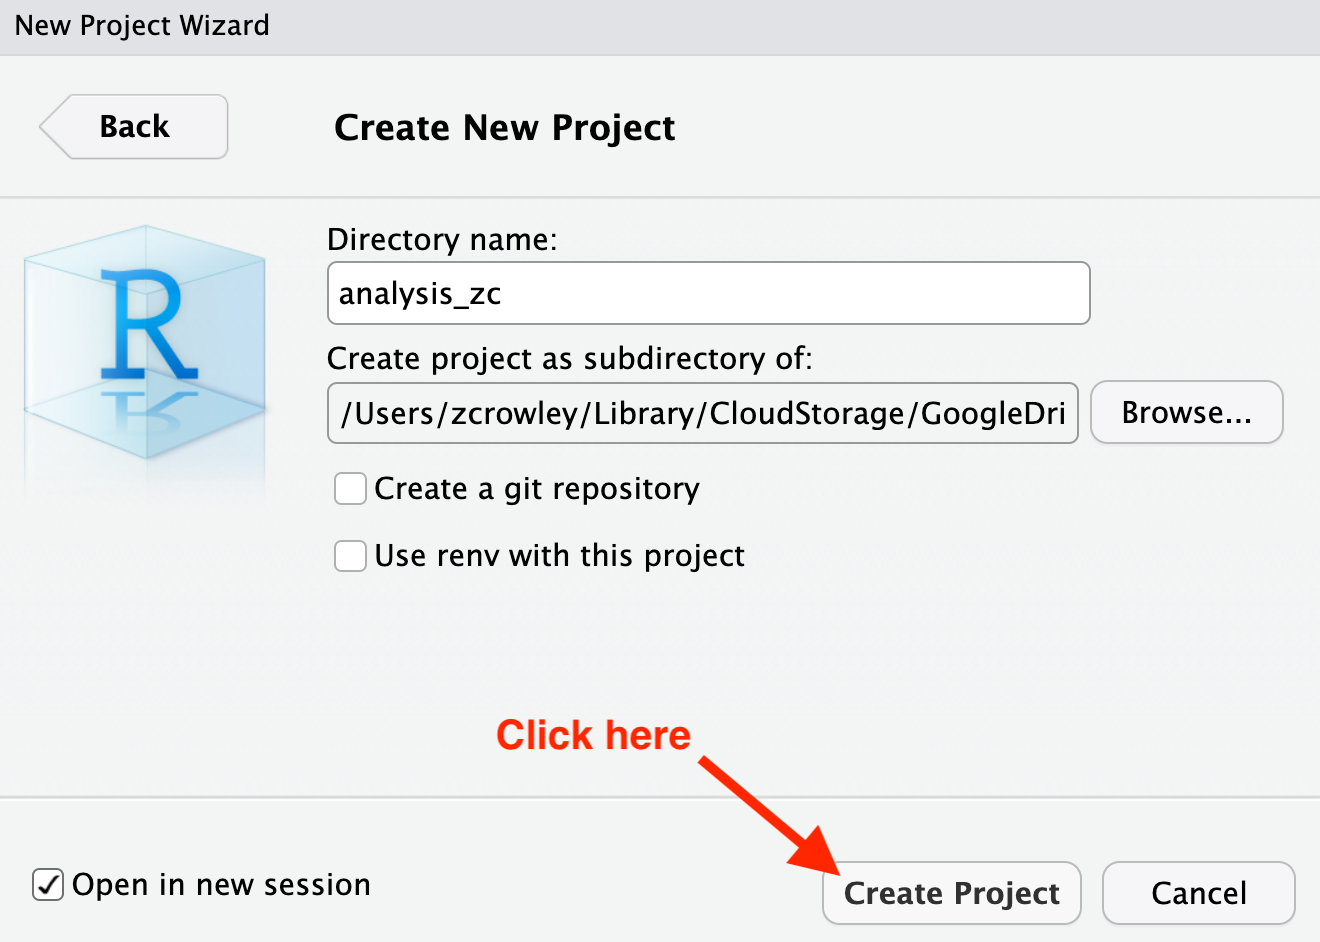
Figure 4.5: New Project Wizard- Create New Project
Another way to create an RStudio
Project is by using the rstudioapi6 package, which allows
you to interact with RStudio with R code.
The code below creates a new folder, then creates the
.Rproj file with the same name, running the last line of
code will open the new RStudio Project in
a new RStudio instance:7
# file path for new `analysis` folder:
analysis_fp <- fs::path("Phase 2 - Evaluation", "Data Analysis", "Year 4 (2023-2024)", "analysis")
# Create a new folder named `analysis` in for "Data Analysis"/Year4_(2023-2024):
fs::dir_create(analysis_fp) # Data Analysis Year 4

# Creating a new RStudio Project in the `analysis` folder:
rstudioapi::initializeProject(path = analysis_fp)

# Open the new project in a a new `RStudio` instance:
rstudioapi::openProject(path = analysis_fp, newSession = TRUE)
Now that we have an RStudio Project we can use it to
save all of the files necessary for a data analysis task inside its
folder and we don’t have to worry about using setwd() to
manage the working directory.
It is also
Managing File Paths with the here Package
In order to highlight another advantage for working in an
RStudio Project, let’s say we were tasked with the data
analysis of a hypothetical Blackstone project. The project folder named
2429_DEMO in the Blackstone Google Drive and the analysis
is for its fourth year (Year 4 (2023-2024)).
We have completed the above steps to create an RStudio
Project in the
Phase 2 - Evaluation/Data Analysis/Year 4 (2023-2024)
folder which we named ‘analysis’ as shown in the directory tree below,
there is a subfolder of
Phase 2 - Evaluation/Data Analysis/Year 4 (2023-2024) named
‘analysis’ with an RStudio Project file named
analysis.Rproj. We have also created an Rmarkdown file in
the same folder called report.Rmd.
#> /home/runner/work/_temp/Library/blackstone/2429_DEMO/Phase2_Evaluation/Data_Analysis
#> ├── Year1_(2020-2021)
#> ├── Year2_(2021-2022)
#> ├── Year3_(2022-2023)
#> └── Year4_(2023-2024)
#>     └── analysis
#>         ├── analysis.Rproj
#>         └── report.Rmd
To launch the RStudio Project we can
either go to the top menu bar in RStudio, click
‘File’, ‘Open Project…’ and navigate
to the analysis.Rproj and click ‘Open’ or
go to your operating system’s File Finder/Explorer navigate to the
analysis.Rproj and double-click it.
To confirm which RStudio Project is
open in your current RStudio instance go to the top-right
corner of RStudio.
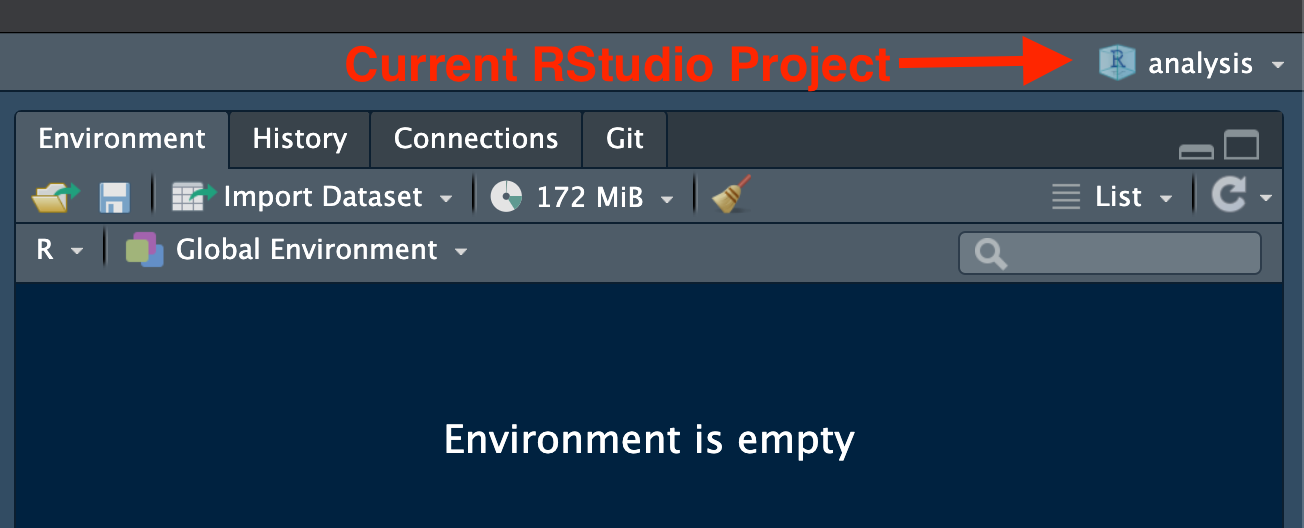
Figure 5: Current RStudio Project (top-right corner of IDE)
If you click on the current RStudio
Project shown above, a drop-down menu gives you options to
switch between Projects or open new
RStudio instances to run multiple projects at once.
Now, if we have opened the RStudio
Project file analysis.Rproj our working directory
will be set to the analysis folder with this file path:
/home/runner/work/_temp/Library/blackstone/2429_DEMO/Phase2_Evaluation/Data_Analysis/analysis
But that is the file path on my local machine, it would
differ based on the location of the 2429_DEMO folder
because how your Google Drive Desktop is set up (different user names or
shortcut IDs). This also creates an issue if we want to navigate to the
Data folder in our code to import data for analysis. How do
we write out a file path that is stable over time and for different
users?
Introduction to the here Package
The here package
solves this issue by using RStudio Project
files (.Rproj) to create relative file paths. In
R anytime we set the working directory (either by using
setwd() or by opening an RStudio
Project), we can reference file paths using paths relative to
the working directory using getwd(). But if that file path
changes, either by moving folders or by the code running on different
machines, this method will no longer work.
The here packages provides a way to always reference the
location of a specified RStudio Project
files (.Rproj) as the root directory for relative
file paths, even if the working directory is switched to a subfolder of
an RStudio Project folder (which is the
case when knitting an .Rmd file).
The here package has two simple functions which allow us
build reproducible file paths.
Using the here Package
If the here package is not installed, install it with:
install.packages("here")
The first step is to set the current location of the file you are
working in using here::i_am()8 with a relative path
to the project root directory. This has to be done at the beginning of
an R script (‘.R’) or first code chunk in an Rmarkdown file
(‘.Rmd’).
If we were working in the file report.Rmd contained
inside the analysis folder that would look like this:
here::i_am("report.Rmd")
#> here() starts at /home/runner/work/_temp/Library/blackstone/2429_DEMO/Phase2_Evaluation/Data_Analysis/Year4_(2023-2024)/analysis
here::i_am() finds and returns the project root
directory. Since the file report.Rmd is contained alongside
the analysis.Rproj file inside the analysis
folder, the call above returns the file path to the
analysis folder.
Once we have called here::i_am(), we can then load the
here package and use the here() to again
return the project root folder.
library(here)
here()
#> [1] "/home/runner/work/_temp/Library/blackstone/2429_DEMO/Phase2_Evaluation/Data_Analysis/Year4_(2023-2024)/analysis"
To be clear, the here() function differs from just
returning the current working directory. In fact, if you change the
working directory and here() will still return the project
root directory set by the initial call to here::i_am().
Relative File Paths with here()
Now, we can use here() to build relative paths to read
and write data. This works by including the folder and file destination
inside the function, either as a single string or separated by commas.
If we wanted to build a path to the Data folder in our
example project folder, let’s see how that would work.
First, it is helpful to review the folder structure:
#> /home/runner/work/_temp/Library/blackstone/2429_DEMO/Phase2_Evaluation
#> ├── Client_Meeting_Notes
#> ├── Concept_Data_Analysis_Guide
#> ├── Data
#> │   ├── Year1_(2020-2021)
#> │   ├── Year2_(2021-2022)
#> │   ├── Year3_(2022-2023)
#> │   └── Year4_(2023-2024)
#> │       ├── clean_data
#> │       │   └── sm_data_clean.csv
#> │       ├── post_data
#> │       │   └── sm_data_post.csv
#> │       └── pre_data
#> │           └── sm_data_pre.csv
#> ├── Data_Analysis
#> │   ├── Year1_(2020-2021)
#> │   ├── Year2_(2021-2022)
#> │   ├── Year3_(2022-2023)
#> │   └── Year4_(2023-2024)
#> │       └── analysis
#> │           ├── analysis.Rproj
#> │           └── report.Rmd
#> ├── Instruments
#> └── Logic_Model
In order to build a path from the
Phase2_EvaluationData_Analysis/Year4_(2023-2024)/analysis
(which is out top-level project directory) to the
Phase2_Evaluation/Data folder, we need to go “up” three
levels which is done with file paths using “..” like this:
../../../
Using here() we can build a relative path from the
analysis to the `Data folder:
# Setting up file path to the Data folder for Year 4:
data_fp <- here("../../../Data") # or can be written as: here("..", ".." ,".." ,"Data")
data_fp
#> [1] "/home/runner/work/_temp/Library/blackstone/2429_DEMO/Phase2_Evaluation/Data_Analysis/Year4_(2023-2024)/analysis/../../../Data"
This path can be added to other file paths to complete the desired
path to any number of files within the Data folder.
Returning to the original example evaluation folder, if we want to
read in data from the Data/Year 4 (2023-2024) folder to run
analyses in the report.Rmd we can set up a series of file
paths using here().
# Setting up file path to the Data folder for Year 4:
data_year4_fp <- here(data_fp, "Year4_(2023-2024)") # or can be written as: here("..", ".." ,".." ,"Data", "Year4_(2023-2024)")
data_year4_fp
#> [1] "/home/runner/work/_temp/Library/blackstone/2429_DEMO/Phase2_Evaluation/Data_Analysis/Year4_(2023-2024)/analysis/../../../Data/Year4_(2023-2024)"
We can re-use that file path to build the rest of the path needed to read in the clean data9 from Year 4:
# File path to clean data from Year 4 named: "sm_data_clean.csv"
here(data_year4_fp, "clean_data", "sm_data_clean.csv")
#> [1] "/home/runner/work/_temp/Library/blackstone/2429_DEMO/Phase2_Evaluation/Data_Analysis/Year4_(2023-2024)/analysis/../../../Data/Year4_(2023-2024)/clean_data/sm_data_clean.csv"
# or can be written as: here("..", ".." ,".." ,"Data", "Year4_(2023-2024)", "clean_data", "sm_data_clean.csv")

# Reading in the clean data from Year 4 named: "sm_data_clean.csv"
readr::read_csv(file = here(data_year4_fp, "clean_data", "sm_data_clean.csv"), show_col_types = FALSE, n_max = 3, col_select = c(1,6:12))
#> # A tibble: 3 × 8
#>   respondent_id email_address      first_name last_name unique_id post_knowledge
#>           <dbl> <chr>              <chr>      <chr>         <dbl> <chr>
#> 1  114628000001 coraima59@medhurs… Dellia     Collier    24290001 A little know…
#> 2  114628000002 mstamm@hermiston.… Etter      Williams…  24290002 Not knowledge…
#> 3  114628000003 precious.feil@gma… Marin      Lind       24290003 Extremely kno…
#> # ℹ 2 more variables: post_research_1 <chr>, post_research_2 <chr>
Try Yourself
The blackstone R package installation comes with a full
example project directory, with the analysis folder
containing analysis.Proj and the report.Rmd.
The final code chunk below allows you to easily access the files where
ever they are installed on your local machine. Any edits you make to
these files will be lost when you re-install/update the
blackstone R package.
Run the code below to open the example project in a new
RStudio instance and then open report.Rmd by
copying the next line of code into the console in the new
RStudio instance:10
# Code to open the example `analysis` `RStudio` Project (will launch in a new `RStudio` instance):
rstudioapi::openProject(path = fs::path_package("2429_DEMO/Phase2_Evaluation/Data_Analysis/Year4_(2023-2024)/analysis/analysis.Rproj", package = "blackstone"),
                        newSession = TRUE)

# Code to open "report.Rmd" (must be in the `analysis` `RStudio` Project):
rstudioapi::navigateToFile(
  file = "report.Rmd"
)
Additional Resources for R, RStudio, and
Project Workflows
R for data science: “Workflow: 6.2 Projects” chapter by Hadley Wickham
What They Forgot to Teach You About R: “3 Project-oriented workflow” chapter by Jenny Bryan, Jim Hester, Shannon Pileggi, and E. David Aja
“Project-oriented workflow” Tidyverse Blog Post by Jenny Bryan